Wood, similar to every single natural material, spoils over the long run and requires standard support to remain in great shape. If you've claimed a wood deck for quite a while, you realize how climate, outrageous temperatures, and UV openness can harm it. The uplifting news is there are a lot of sealers and items accessible on how to waterproof a wood deck to forestall hurt on the off chance that you know how to waterproof a deck.
It's impossible to 100 percent waterproof a wood deck, yet best practices like yearly resealing outside wood or introducing blazing tape can broaden the existence of your deck. You can likewise decide to introduce composite or PVC decking, which is unquestionably somewhat made of inorganic materials that are less inclined to deterioration and don't require fixing.
If you have any desire to work on the look and strength of your deck, here are our ways to waterproof a wood deck. If you'd prefer not to spend each spring fixing your wood deck, contact a project worker to discuss low-support decking choices like composite or PVC sheets.
Stage 1. Assemble Your Waterproofing Materials
Stage 1. Assemble Your Waterproofing Materials
Stage 1. Assemble Your Waterproofing Materials
You'll have to get a couple of things from your neighborhood home improvement store to clean and seal your wood deck and overhang appropriately. Do an exploration to conclude what items are ideal for your wood decking before getting these materials:
- Outside wood sealer
- Paintbrush or roller
- Arbitrary orbital sander
- 60-80 coarseness sandpaper
- 100+ coarseness sandpaper
- Deck more clean
Meet a balcony waterproofing contractor for hire in your city.
Stage 2: Assess Your Deck
Stage 2: Assess Your Deck
There's not a great explanation for putting away your time and cash fixing a wood deck that is now very much safeguarded, so your initial step ought to be a water test to affirm your deck is expected for care. You should simply put a drop or two of water on your decking. On the off chance that the wood decking ingests it, it's prepared to be re-fixed and you ought to eliminate existing paint or sealer. On the off chance that the water stays rose on a superficial level, your current sealer is functioning admirably.
Regardless of whether you want to reseal your deck, it's smart to every year finish an exhaustive examination. Search for shape or mold, and harm like split or distorted wood decking that should be fixed.
While composite or PVC decking won't be fixed, it's vital to examine and clean your waterproofing wood deck joists and backing structure. Assuming it's made of wood, you can likewise seal these segments to broaden your base's life and gloss.
Stage 3: Get ready and Clean Your Deck
Stage 3: Get ready and Clean Your Deck
Readiness is key for a legitimate seal. Before you begin, really look at the climate to guarantee have the opportunity to finish your venture. While restoring a deck, temperatures ought to remain between 50-90°F, and you ought to keep away from downpours or direct daylight.
If the gauge is clear, eliminate all furnishings and things from the deck's surface. Any leftover garbage ought to be cleared with a brush or cleared with a leaf blower. Remember to clear out the breaks between deck sheets, as well.
At the point when all garbage is eliminated, you can then clean your deck with a suitable deck cleaner to eliminate the leftover soil and buildup. At last, you ought to sand the wood deck with 60-80 coarseness sandpaper. If vital, you can do a second pass with a higher coarseness sandpaper of around 100 for a smoother finish. Give your deck one more wash or flush with a tension washer, and you're prepared to begin fixing.
Helpful Hint:
Helpful Hint:
Continuously wear defensive gloves and well-being glasses while sanding and pressure washing.
Stage 4: Seal Your Deck
Stage 4: Seal Your Deck
After your wood deck is perfect and dry, you can apply your most memorable layer of sealer. It's least demanding to utilize a paint roller, yet you can likewise utilize a paintbrush or paint sprayer.
Utilize a moderate measure of sealer for your most memorable coat and apply it uniformly to all wood surfaces while working with the bearing of the grain. Be certain not to apply your jacket too thickly, which can make the completion strip or chip.
You can apply a dainty second coat if you like, yet each layer of sealer ought to dry for no less than 24 hours before applying the following layer.
Stage 5: Dry for 48 Hours and Appreciate
Stage 5: Dry for 48 Hours and Appreciate
It will require 48 hours from the last sealer application for it to fix. Up to that point, try not to utilize your deck. It might look and feel dry, however, utilizing it before the sealer is completely relieved can harm the seal and you might need to restart the interaction.
Following two days, you're free to supplant all of your porch furniture and partake in your newly fixed wood deck.
The Most Effective Method to Waterproof under Your Deck
The Most Effective Method to Waterproof under Your Deck
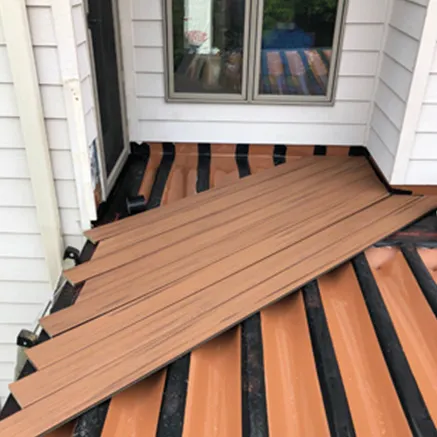
Safeguarding the space under your deck can forestall primary debasement and possibly expand your usable space. It's smart to likewise seal wooden under-deck joists, regardless of whether you have a composite deck that doesn't bother to be fixed.
If you want to construct another deck, you can likewise apply blazing tape to the highest point of the joists. This lessens water infiltration and can shield your timber from spoiling. Mortgage holders with a raised deck might consider introducing an under deck water the executive's framework like waterproof companies. This component gathers water that moves through your deck and diverts it away from the space under, like your rooftop's drains. A water-the-board framework permits you to utilize the space under your deck without stressing over downpours, and it opposes shape and buildup from water openness.